Tuesday, August 25, 2020

WOODCRAFT GIVES TIPS FOR WORKING SMARTER BY WORKING SAFER

Woodcraft, leading retailer for woodworking tools and supplies, offers tips to help home improvement do-it-yourselfers to work smarter by working safer as they enter the spring/summer home improvement season.

Homeowners have grown increasingly hands-on when it comes to improving their homes. Rather than call a contractor to do household projects like finishing an attic or basement, combining smaller rooms into larger areas or building/installing new cabinets, nowadays more and more homeowners act as their own “contractor” or handyman.
“Though it’s often more affordable and rewarding for homeowners to tackle projects themselves, it is important to approach these projects with safety in mind,” Darin Lawrence, Woodcraft director of product development said.  “Accidents are more likely to occur when the person working on the home is a weekend warrior instead of a trained professional. To help do-it-yourselfers work safely and successfully, Woodcraft offers the following tips.”

Be Prepared & Understand the Challenges

Begin every project with all the tools, supplies and plans you need rounded up and close at hand to keep your focus on the work, not something you still need. Be sure to include safety gear, a first aid kit, and a charged cellular phone, and work with a partner on the big projects whenever possible.
Inexperienced DIYers often struggle because they are using the wrong tools for the task or are unfamiliar with their tools, which increases their risk of accident and injury.
“If the project you plan to undertake involves unfamiliar tasks or tools you have not used often, do some research. Woodcraft offers books about home improvement topics, as well Woodcraft Magazine technique downloads and how-to videos for many products online,” product manager Ben Bice said. “Or get some expert advice at your nearest Woodcraft store or by calling (800) 535-4486 for technical advice.”
Smarter Safer
The JET Air Filtration System will clean and circulate the air.

Create a Safe Working Environment

When working indoors, it is important to take steps to keep the air free of dust and debris for the health and safety of those breathing it,” Woodcraft product manager Peter Collins said. To maintain a dust-free environment, Collins recommended using products like the Oneida 5-Gallon Molded Dust Deputy Kit that works with a shop vacuum to capture 99% of the dust.
National power tool manager Andrew Bondi suggested also using a complementary tool, the JET Air Filtration System that will clean and circulate the air, filtering out 99% of five-micron size and 85 % of one-micron size particles.
To protect the DIYer as he or she cuts, sands, fastens, joins and restores wood, uses stripping and finishing products and paints, and sharpens tools, Woodcraft suggests using protective gear for the head, mouth, eyes, ears, hands, and feet, such as:

Select User-Friendly Products

To join wood pieces for framing, building or repairing furniture and cabinets and other household projects, product manager Peter Collins said many DIYers opt for pocket-hole joinery. “A circular saw and a drill are all you need to do pocket-hole joinery with the popular Kreg Jig System,” Collins said.
For those who need to use a table saw, national power tool manager Andrew Bondi suggested the new SawStop Jobsite Saw with cart and fence. “This portable offering from SawStop is the new standard in jobsite safety. Now you can have the precision, quality and safety of a SawStop saw wherever the job takes you.”

Tuesday, August 4, 2020

How to Remove a Tree Stump Painlessly


Need to know how to tackle tree stump removal? Follow this step-by-step strategy to make it simple and painless.

Every editorial product is independently selected, though we may be compensated or receive an affiliate commission if you buy something through our links.

Introduction

This article shows you how to remove a tree stump without breaking your back. This method is safe and effective, and doesn't require a lot of manual labor. But you have to be patient. The process can take several weeks.
Family Handyman

Tools Required

  1. 12 in. bit extension
  2. Ax
  3. Corded drill
  4. Extension cord
  5. Safety glasses
  6. Stump remover (optional)

Materials Required

  1. Stump remover chemicals
  2. Water


Project step-by-step (4)


Step 1

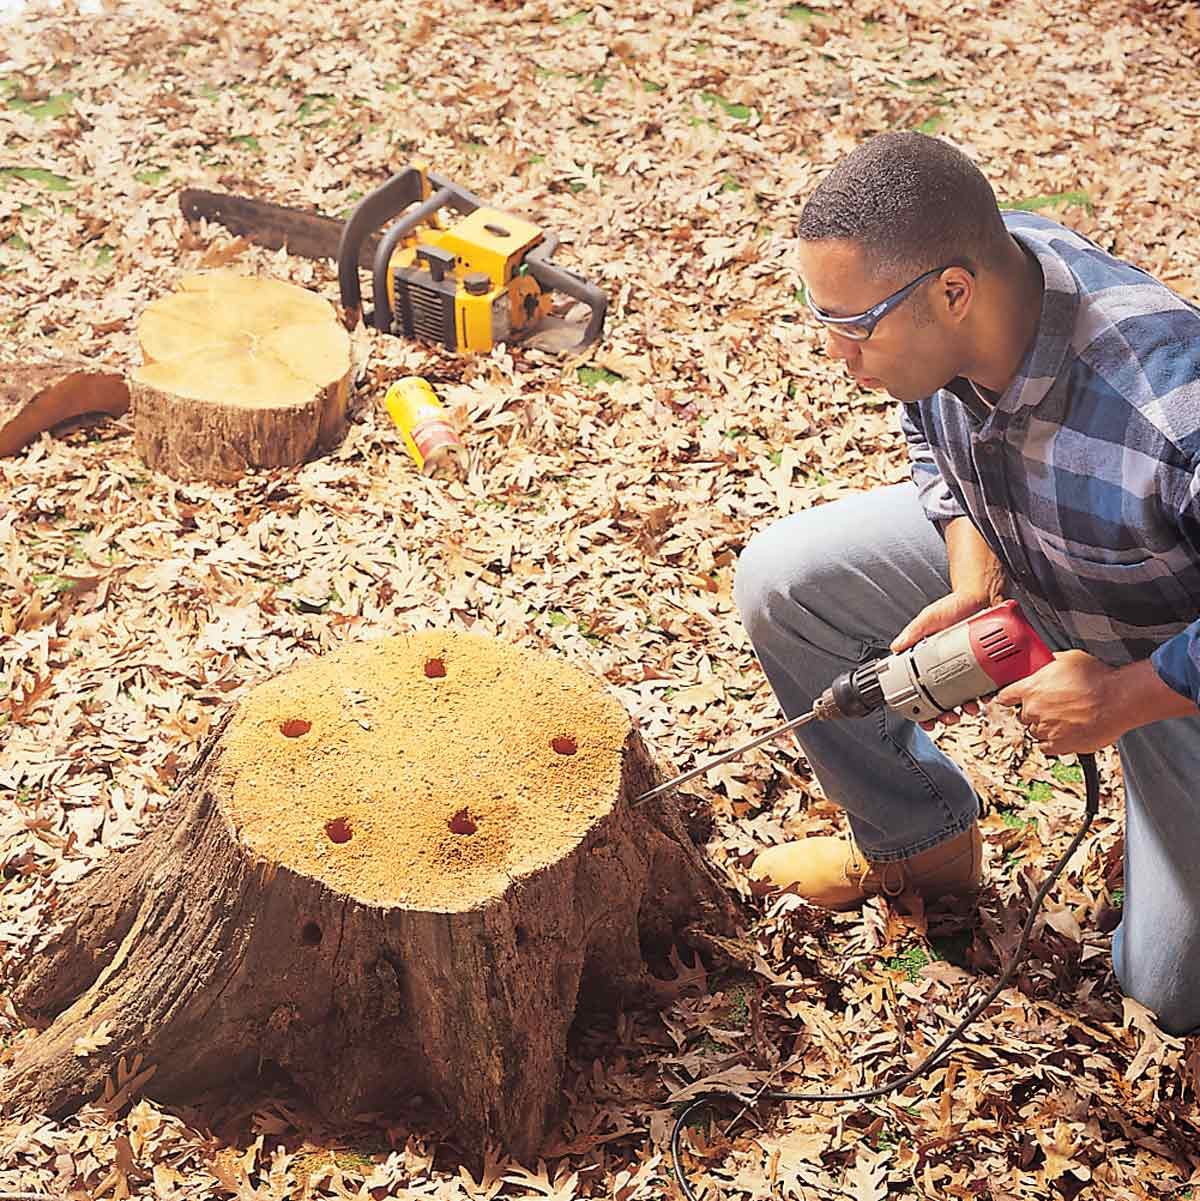
Drill Holes in the Stump

  • Cut off as much of the top of the stump as possible with your chainsaw.
  • Use a 1-inch spade bit with a spade bit extension to drill evenly spaced holes roughly every 6 to 8 inches around the perimeter of the stump. Make the holes about 12 inches deep and three to four inches back from the edge.
  • Drill more holes three to four inches down from the rim at a 45-degree angle to connect with the first holes. Be sure the angle of the lower intersecting holes is above horizontal and they meet the vertical holes at a point well above 12-inches. This ensures the chemicals you're about to pour in from the top don't dribble out on the ground.
    • Pro tip: The bottom angled holes will acts as vents for burning, or help the rotting process.

Drilling holes in a tree stumpFAMILY HANDYMAN

Step 2

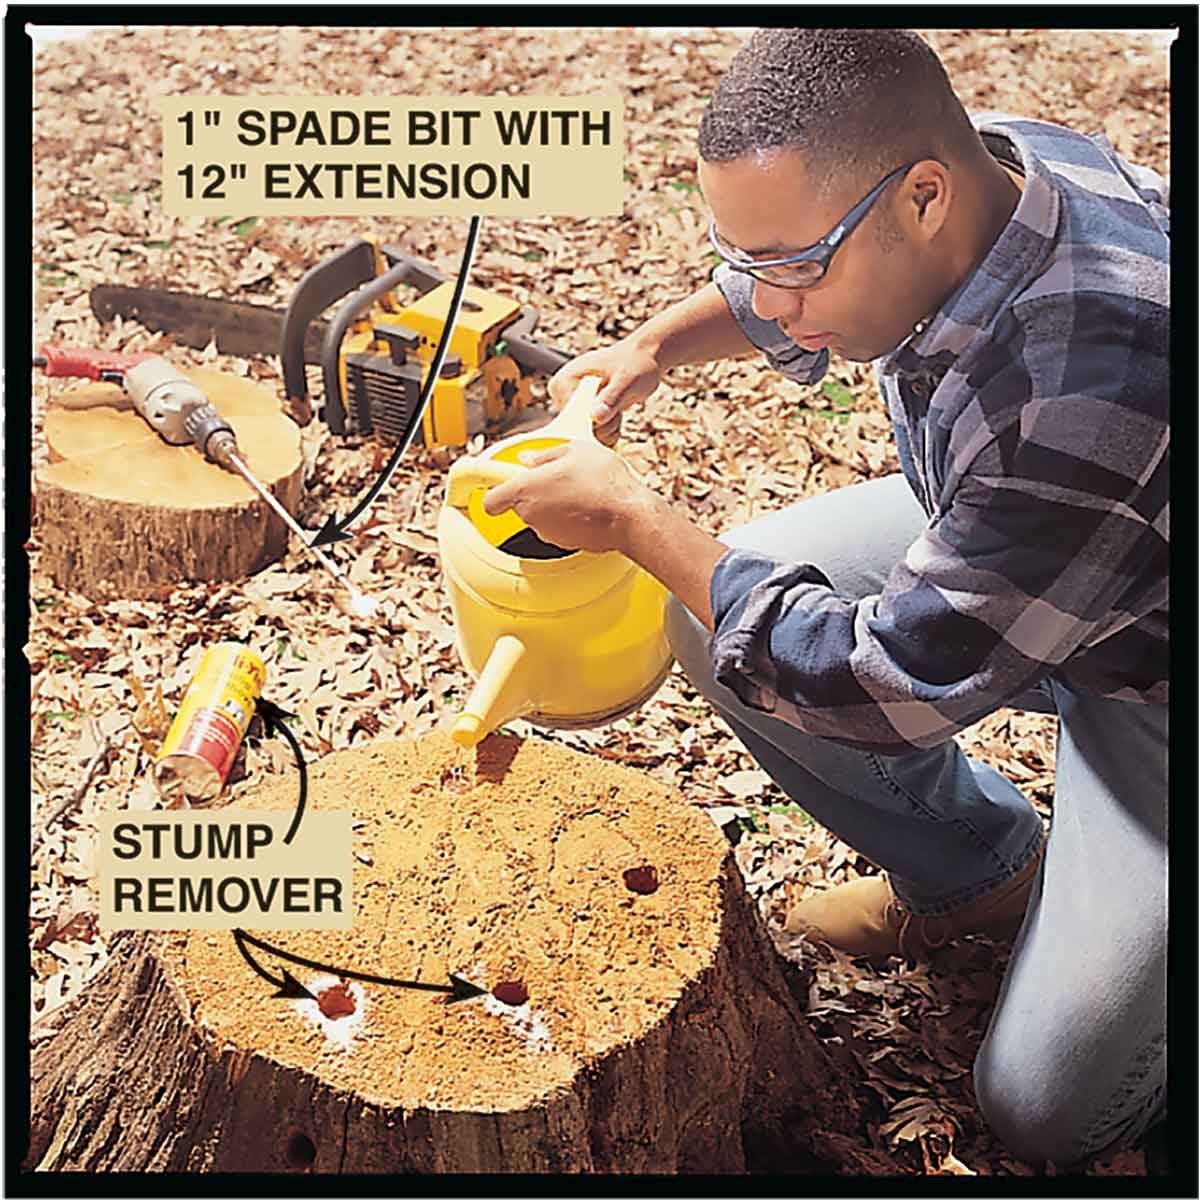
Pour Tree Stump Removal Chemicals into the Holes

  • Pour 3 to 4 ounces of tree stump removal chemicals into each of the holes in granule form, then fill the holes with water so the chemicals can soak in.
  • Wait 4 to 6 weeks for the chemicals to accelerate the rotting process in the stump. You'll know this has happened when the stump becomes soft and spongey.
    • Pro tip: You could also try a more natural method with epsom salt stump removal.
  • Break out the rotten wood with a sharpened felling ax.
Pouring chemicals into a tree stumpFAMILY HANDYMAN


Step 3

Try a Power Stump Grinder

  • Rent a power stump grinder to remove a stump more quickly.
00:00 of 02:03Volume 0%
FAMILY HANDYMAN
Step 4

Get rid of the tree roots

  • For a completely labor-free removal, some manufacturers of tree stump removal chemicals suggest burning out what's left of the stump by pouring kerosene or fuel oil (never gasoline) into the holes.
  • Wait until the liquid completely penetrates the wood (this could take a few weeks). Then drop a match into the holes to start the burning process.
  • The stump will smolder for days, eventually leaving a charcoal-filled hole.
    • Pro tip: It's dangerous having a giant, smoldering ember in your yard, so some precautions are in order. Envelop the stump in chicken wire, remove all leaves from the vicinity before ignition and keep an eye on it! If the stumps in a spot you can reach with a garden hose, stand by ready to spray things down if the fire shows any signs of spreading.
  • Finish the job with an ax if you're concerned about safety. Keep in mind, manual tree stump removal works only on seasoned (older) stumps that have been dead for a year or so, not freshly cut tree stumps.
Source: https://www.familyhandyman.com/project/how-to-remove-a-tree-stump-painlessly/